Monday, October 24, 2016

Convert 3D Blu-ray to 3D MP4 for Razer OSVR HDK 2 

Razer's first entry into virtual reality seems more promising on the software side, though making everything open source may bring problems of its own. If you can't afford a Samsung Razer OSVR HDK 2 or an Oculus Rift, now, get a Razer OSVR HDK 2. Wearing it, you just like step into a fantasy world with brilliant immersive viewing experience. Ever thought of enjoying 3D Blu-ray movies with OSVR HDK2. Have no idea about this? Don't worry! Here, in this article, you will learn how to get 3D Blu-ray movies into 3D MP4 for Razer OSVR HDK 2  for enjoyment with ease.

As far as I know, most Blu-rays are in the "frame packed" format which can’t be supported by Razer OSVR HDK2. If you would like to enjoy 3D Blu-ray movies with Razer OSVR HDK2, you should first transfer a frame packed Blu-ray to 3D side-by-side or top-to-bottom MP4/MKV files with Razer OSVR HDK2-friendly formats.

It’s not a big deal to rip 3D Blu-ray to 3D MP4 as long as you have this Blu-ray ripping tool, Pavtube BDMagic.

With it you can easily convert Blu-ray movies to 3D MKV/MP4/MOV/AVI/WMV and add 3D effect in Analygph, T/P and SBS; of course, you can also rip 3D Blu-ray to normal 2D for more widely use. To be more specific, it offers several settings to let you free change 3D effect at your needs. You can make 3D movies at home! Highly recommended to give a shot! Read Pavtube BDMagic review.

Tips:

1. 3D effect on converted video is added by program; it may not be exactly the same as your original 3D blu-ray disc.

2. For Mac users: pls choose Pavtube BDMagic for Mac.

Tutorials: Rip 3D Blu-ray to 3D MP4 for Razer OSVR HDK 2 

Step 1. Run Pavtube BDMagic as the best 3D Blu-ray Ripper; load disc.

Click “Load files” to load blu-ray movie from ROM, blu-ray folder or import Blu-ray ISO file directly. There’s not need to run virtual drive to mount the ISO files; This 3D Blu-ray Ripper will recognize them automatically.

Because the subtitles are not hardcoded on the Blu-ray video, so we can choose the subtitles which you want to keep. Just click the drop down menu after "Subtitles", force subtitle can be checked for output so as to help you to read the unknown language and fully enjoy the Blu-ray movies.

Step 2. Choose format.

Click the “Format” bar and find “3D Video”, you will find several presets for MKV/MP4/MOV/AVI in Side-by-Side 3D, Top-Bottom 3D and Anaglyph 3D.  Here MP4 Side-by-Side 3D Video(*.mp4) is most recommended formats, but you still need to check your device specification to choose one accordingly.

Step 3. Adjust 3D effect.

Click “Settings” to enter customize specs window; you can adjust resolution(size), bitrate, frame rate, 3D mode and depth here.

In order to get customized videos, you can add subtitles to your own videos.

Find "Edit" icon and then click it, you will find video editor. There you can Trim, Crop, Add watermark and Effect. Above all, Subtitle can be added here. 

Step 4. Start Conversion.

Click the big red “Convert” to start the conversion. Wait for a while and click “Open output folder” to locate the converted video easily.

Now get your Razer OSVR HDK 2 to watch your own 3D movies in on PC on your own couch as you wish! Have a nice time! 

Related Articles:

Wednesday, October 19, 2016

Pavtube Blu-ray Ripper Upgraded Supporting Blu-ray MKB v62

It is more and more difficult to decrypt Blu-ray discs because they have higher and higher encryption scheme. For those who love to rip Blu-ray to digital files to stream on portable devices, TVs, game consoles over network, it is the time to upgrade your Blu-ray Ripper to have the power to decrypt the most complex Blu-ray encryption - MKB v62. If you are a user of Pavtube software, you are a lucky man.

Pavtube Upgrade Support MKB v62

Today, Pavtube Studio has upgraded his main 3 Blu-ray ripping tools to support the new Blu-ray encryption MKB v62. If you are the customer of Pavtube product, you can get the upgrade free to get the technology of decrypting MKB v62. Of course, this upgrade won't affect the original functions of Pavtube Blu-ray Rippers to break down Blu-ray encryptions including AACS, BD+,UOP,DRM, HDCP, BD-ROM, Region codes, MKB v61, etc.

These three Pavtube Blu-ray Ripping tools are exactly Pavtube BDMagic, Pavtube ByteCopy, Pavtube Video Converter Ultimate.Now, let’s learn the upgrade and the main features of each Blu-ray ripping tool.

What’s new?

1.support latest Blu-ray MKB v62.

2.fix some bugs.

Key features of ByteCopy

– 1:1 backup BD/DVD with original video structure.

– Main title copy BD/DVD with smaller size.

– Copy BD/DVD to MKV with lossless quality.

– Convert BD/DVD to MP4/MOV/AVI with multiple subtitle/audio streaming.

More functions of ByteCopy is in the review.

Key features of BDMagic

– Full copy and directly copy Blu-ray and DVD

– Convert Blu-ray/DVD to SD/HD MP4, MKV, AVI, etc to NASMedia Server, etc.

– Convert 4K Blu-ray to H.265/HEVC 4K MP4/MKV

– Rip Blu-ray preserving AC3, AAC, DTS audio in stereo, 5.1, 7.1 sound.

More functions of BDMagic is in the review.

Key features of Video Converter Ultimate

– Decrypt Blu-ray and DVD to virtually any SD/HD video

– Convert 4K Blu-ray to SD/HD MP4, WMV, MOV, QuickTime, ProRes for editing in NLE.

– Copy Blu-ray/DVD to M3U8 for HTTP live streaming

– Convert, shrink, compress Blu-ray, DVD to YouTube, FaceBook, Vimeo, Instagram, Google Plus, etc.

More functions of Video Converter Ultimate is in the review.

The Blu-rays you can Decrypt:

You can use Pavtube Blu-ray Ripper to decrypt some new released Blu-ray including: The Walking Dead, Stranger Things, The RevenantThe MartianHannibal TV Series, Game of Throne (1-6), Spectre 007Zootopia, Harry Potter, Independence Day, The Divergent Series: Allegiant, The WalkAvatarHouse of Cards, Bridge of Spies, Mad Max: Fury Road, Room, Spotlight, By the Sea, The Family Fang, Absolution, Roots, Code of Honor, Now You See, The Adderall Diaries, Arch Angels, Shchedrin: The Left-Hander, Sherlock, Ghost Rider / Hellboy, The Da Vinci Code, The Da Vinci Code, Doro: Strong and Proud, etc.

Src: http://www.love-media-player.com/pavtube-upgraded-supporting-mkb-v62/

Monday, October 17, 2016

Rip National Lampoon's Christmas Vacation Blu-ray/DVD to MP4, AVI, MOV on PC

National Lampoon's Christmas Vacation is the best Christmas movie of all time. If you have never seen "Christmas Vacation", stop right now and go to the video store and rent it. Then go to Amazon and order your own copy because you'll want to watch it over and over again each holiday season. Also, you can copy your rented National Lampoon's Christmas Vacation Blu-ray/DVD to MP4, AVI, MOV on PC for forever keeping.

Besides, ripping National Lampoon's Christmas Vacation Blu-ray/DVD to MP4, AVI, MOV on PC allows you to watch the Christmas movie over and over again without worrring scratching the discs. To convert National Lampoon's Christmas Vacation Blu-ray/DVD to MP4, AVI, MOV on PC, you need a Blu-ray Ripper or DVD Ripper to remove Blu-ray and DVD copy protection and shift the format.

Pavtube BDMagic is strongly recommended here, which is designed for ripping both Blu-ray and DVD. It can decrypt National Lampoon's Christmas Vacation Blu-ray and DVD to MP4, MKV, MOV, AVI, WMV, FLV, H.265, M3U8, etc format video and extract FLAC, MP3, MKA, WMA, etc audio from Blu-ray and DVD movies.

What's more, Pavtube BDMagic can 1:1 backup Blu-ray and DVD National Lampoon's Christmas Vacation with original video structure or directly copy Blu-ray and DVD main title.

Free Download this Top Blu-ray Ripper:


How to Rip National Lampoon's Christmas Vacation Blu-ray/DVD to MP4, AVI, MOV on PC?

Step 1. Load the Blu-ray and DVD disc.

Insert your National Lampoon's Christmas Vacation DVD/Blu-ray disc into your drive, run Pavtube BDMagic and click “BD/DVD disc” icon to load movie from DVD source(Disc, folder, ISO).

rip blu-ray to mp4

Note: Set your wanted subtitles and audio track from the drop-down box of “Subtitles” and “Audio” tab.

Step 2. Specify the output format as MP4.

Choose suitable format by clicking “Format” drop-down menu. There are optimized format for iPhone 7, Galaxy Note 7, Galaxy Tab S, iPad Air 3, Surface Pro 4 and more. Basically the “Common Video -> H.264 Video (*.mp4)” is a universal format for Android/iOS/Windows tablets and smartphones. You also can choose MKV, AVI, MOV, etc format from "Common Video" and "HD Video".

rip blu-ray to mp4 with pavtube

Step 3. Start converting National Lampoon's Christmas Vacation Blu-ray/DVD

When all the settings are done, click the “Convert” button to begin converting National Lampoon's Christmas Vacation Blu-ray and DVD to MP4 format.

When the conversion ends, you can enjoy the National Lampoon's Christmas Vacation movie on your MP4 compatible devices without any hassles.

Related Articles;

Monday, October 10, 2016

Copy DVD to Hard Drive using H.265 compression

Many people would like to rip their extensive DVD collection to hard drive, making use of the h.265 codec, since it will cut down significantly on space. The new codec H.265(also known as HEVC) is twice as efficient as H.264. If you choose to rip DVD to H.265, you will save lots of space of your hard drive.

To convert DVD on hard drive in H.265 codec video, you will need a DVD Ripper that can encode H.265. Searched for software capable of using H.265 compression, Pavtube BDMagic will be shown to you. With this software, you can convert DVD to H.265 MP4/MKV in smaller size as possible and keep the almost same quality.

Utilizing the highly efficient HEVC H.265 format in MKV/MP4 containers, it results in files with much more manageable sizes than the regular 10GB or 20GB DVD discs we are used to. Besides H.265, it provides more regular video formats like MKV, AVI, WMV, MOV, FLV, WMV, etc. The exported files are playable on your computer as well as tablets & smart phones freely as you want. (BDMagic Review)

If you are running on Mac, Pavtube BDMagic for Mac is also available. Now free try the Blu-ray ripper and follow the guide to accomplish the conversion.

Download and install:


Other Download:
- Pavtube old official address: http://www.pavtube.cn/blu-ray-ripper/
- Cnet Download: http://download.cnet.com/Pavtube-BDMagic/3000-7970_4-75922877.html

How to Copy DVD to Hard Drive using H.265 compression?

Step 1: Load DVD from optical drive.

Click the "File" icon on the top menu bar to load your DVD disc to the program. Pavtube BDMagic also can rip Blu-ray to H .265 video. So you also can load your Blu-ray movies to the software.


Step 2: Select H.265 codec video as output file format.

Tap on the "Format" bar to select "HD Video" > "MKV HD Video(*.mp4)" to output, then hit "Settings" on the main interface to open "Profile Settings" window, under Video settings panel, click "Codec" drop-down selection, choose "H.265" as your final output file codec.


Step 3: Change output file resolution.

If you want to play converted DVD movies on 4K TV, you can upscale the output file resolution to 3840*2160 from "Size(pix)" in the "Profile Settings" window.


Step 4: Convert DVD to H.265 encoded video

Hit the "Convert" icon on the right-bottom to start the conversion process.

Once the conversion is done, click Open button to locate the results videos in H.265 codec. The final videos bring you the smaller size as possible with near zero quality loss.

NEWS!!! Recently, Pavtube Studio has upgraded its top-ranked Pavtube BDMagic to version 4.9.0.0 with supporting the most advanced hardware acceleration NVIDIA CUDA & AMD APP by H.264/H.265 codec, which can give users 30x video transcoding speed than before.

Related Articles:

Monday, October 3, 2016

Make 3D SBS MKV out of 2D video

One of the part of playing 3D video on a VR Headset is to get a 3D content. Some perhaps downloaded 3D video from YouTube, YIFY while some people want to convert their 2D video to 3D MKV for their 3D devices:

I have noticed that there have been many 3D video supported players with the popularity of 3D lifelike movies. I find a 2D movie (.MKV), and it works just fine at home. Now I want to see it at my friend’s house, and they have a 3D system. To have a theatrical 3D experience at home, we’re trying to find an easy way to convert 2D Video/Movie to 3D MKV? Any idea? ” 

best-2d-to-3d-mkv-converter

With the upsurge of 3D movies in recent years, more and more people are looking for 3D converting software to convert 2D to 3D videos that are compatible with all 3D devices. As mentioned above, if you want to convert 2D to 3D MKV, you have to figure out the best 2D to 3D MKV Video Converter to help you get this done.

Best All-In-One Software for 2D to 3D Converter – Pavtube Video Converter Ultimate

- Convert 2D Blu-ray,video to 3D SBS/TAB/Anaglyph video, 3D video to 2D.

- Convert among different types of 3D video.

- Convert Blu-ray, DVD and video files to any video format like MP4, WMV, AVI, FLV, MOV, MKV, VOB, etc

- Rip 3D Blu-ray, 3D MTS, 3D ISO to 3D video.

- Create a 3D video with different 3D effects (Anaglyph, Side-by-Side, Top and Bottom)

- Allows users to adjust 3D depth, A/V parameters.

- Support multimedia players including iPad Air 3/iPad Mini 4, Apple TV 4, Galaxy Note 7, iPhone SE/iPhone 7, iPhone 6s/6s Plus, etc. players like QuickTime, or game consoles like PS3, PSP, Xbox 360, etc.

- Support Anaglyph (Red/Cyan) video as output to watch 3D movie at standard 2D TV.

- Make your own 2D and 3D movies in a virtual cinema, Virtual Reality devices including Samsung Gear VR, Oculus Rift, Zeiss VR One, etc. Learn >> Other 3D Glassless.

Extract audio tracks from a 2D/3D video to MP3, OGG and other formats of audios.

- Come with a built-in video editor.


Firstly download the amazing 3D Video Converter Ultimate and launch it. It’s an ultimate video solution for converting video among all popular file formats including 2D to 3D conversion. And this article is written down in specialty for assisting you to easily create 3D movies with 2D video files in three steps.

Quite easy to convert 2D video to 3D if you have a professional 2D to 3D MKV Video Converter to help.

Step 1. Load your source 2D MKV movie by clicking “Add video” this 2D to 3D MKV Video Converter.

With the function of batch conversion, you are here allowed to import more than one 2D files for your 3D movie creating project.

onvert 2d mkv to 3d format

Step 2. Choose “MKV Side-by-Side 3D Video(*.mkv)” under “3D Video” category for your 3D TV since the reader of the TV handles SBS 3D MKV as supported format. You can also “MKV Anaglyph 3D Video (*.mkv)” or “MKV Top-Bottom 3D Video (*.mkv)” for outputing.

onvert 2d mkv to 3d sbs format

Step 3. If you like, you could adjust video codec, bitrate, frame rate, etc to get better video quality in saved 3D MKV video. Meanwhile, you could choose 3D anaglyph and Depth in Profile Settings to avoid images misaligned.

Tips: When you have trouble getting aligned images in saved 3D SBS MKV video, adjust “Depth” in Profile Settings helps make the film images aligned? perfectly.

Step 4. Hit the “Convert” button to copy your 2D MKV movie to MKV Side-by-Side 3D video. When if finishes, click the “Open” option to locate the created 3D SBS MKV video and you are ready to transfer your 2D MKV movies to 3D TV for entertainment.

Now, you can figure out the best 2D to 3D MKV Video Converter to help you get this done. Enjoy your own amazing digital life! Source from here.

Related Articles:

Monday, September 26, 2016

How to Edit Videos in VirtualDub Easily?

VirtualDub is the open-source and portable video editor with the ability to compress videos while preserving good quality. Although it's not so fully-featured as other professional video editors, it certainly can accomplish more than a few tasks that you might think you need other separate applications for. Here let's see how to edit video using VirtualDub.

Table of Content

Now let’s take a look at video editing in VirtualDub.

Steps to Edit Videos in VirtualDub


1. Split & Trim Video with VirtualDub

VirtualDub has the ability to split videos or trim a portion of a video file with the position slider. To do this:

1. Go to the Video Menu and check the "Direct stream copy" option. Then go to the Audio Menu and do the same.

2. Use the "Edit" > "Set selection start" and "Edit" > "Set selection end" commands to select a portion of video. This can also be done through the mark-in and mark-out buttons below the position slider or through the Home and End keys on the keyboard. Then the currently selected part will now turn blue at the slider.

3. After that, click the "File" > "Save as AVI" menu command to save the AVI segment.

2. Join & Merge Video with VirtualDub

To join/merge multiple video files:

1. Go to "File" > "Append Avi Segment" to add another AVI video you want to have in your big video. You can only add one file at a time, so if you have many small video parts, you have to repeat this step and that may cost a lot of time.

2. Go to Video menu and make sure "Full processing mode " is selected there.

3. Click "Compression" under the Video Menu and choose the video codecs for your output videos. After that, go to "File" > "Save Segmented AVI" to save your work to your computer.

3. Crop Video with VirtualDub

VirtualDub allows you to crop at the beginning of any video filter, you can do it by following the steps below:

1. Check that you're in "Full Processing mode" and then go to "Video" > "Filters". You’ll notice that there’s a Cropping button that’s not quite clickable (because it’s only enabled after you have chosen a filter).

2. Then click on Add... and choose "null transform". That doesn't do anything to your video, but will ungray the Cropping button now.

3. In the Filter input cropping dialog box, you can either drag sides or adjust the offsets to crop videos.

Tips: Change the dimensions will reduce the video quality, but you can use the resize filter to make the cropped video as the original video's resolution.

4. Rotate Video with VirtualDub

VirtualDub also enables you to rotate video in different angles. Here's a little trick to rotate your videos with it.

1. Choose the Video Menu and go to "Filters".

2. Then click on Add..., choose "rotate" and click "OK". Then the Rotate filter will provide you will all the necessary options to rotate your videos.

You will certainly notice the presence of the "rotate 2" filter. Indeed, it allows you to can choose the degree of rotation of the video.

5. Compress Video with VirtualDub

VirtualDub is an ideal program to compress a video file while still retaining the quality of the original. Follow the steps below to see how it works.

1. Make sure "Full processing mode" is selected in the Video menu. Then go to "Video" > "Compression" to bring up the following dialog.

2. As shown in the image, select the XVID MPEG-4 codec and click Configure button to make Xvid settings. You can lower the "Target bitrate" to make your video smaller.

3. Then go to the Audio Menu and select "Full processing mode", and click "Compression" to open the dialog, where MPEG Layer-3 is recommended.

4. Now, to create the compressed file, choose the "File" > "Save as AVI" option and give a new name for the compressed file. Virtualdub should now start saving the compressed file to your chosen location.

6. Remove/Add audio in Video with VirtualDub

Quite a few people like removing sound from the original video file and replacing with new audio. You can easily achieve this with VirtualDub:

1. Go to the Audio Menu and choose "No audio" to remove the original audio.

2. Alternatively, add new audio by hitting on "Audio from other file".

3. Go to the Video menu, select "Direct stream copy" and then go to "File" > "Save as AVI" to save the new audio.

7. Add Subtitles to Video with VirtualDub

You can use VirtualDub along with the VobSub filter filter to embed subtitles (*.srt, *.sub, *.ssa, *.ass, etc) into your movie permanently. Here is how:

1. First download VobSub filter and then unzip to install it. During the VobSub installation, please make sure that you've selected both "VobSub for VirtualDub" and "TextSub for VirtualDub and AviSynth" under plugins. You'll also need to specify the directory where you've unzipped VirtualDub.

2. Then go to "Video" > "Filters" to bring up the Filters dialog. Choose TextSub, click OK to browse to your subtitle file. When You’re ready, press OK.

3. Go to Video menu and make sure "Full processing mode " is selected there. Then click "Compression" and choose the video codecs for your output videos. After that, go to "File" > "Save as AVI" to save your work.

8. Add Logo/Watermark to Video with VirtualDub

You can use the built-in logo filter to add a watermark to your video in VirtualDub within few clicks.

1. Go through "Video" > "Filters" , click Add.. .

2. In the Add Filters dialog, select "logo" to bring up the video logo setting dialog. Here you can add the logo image and adjust the settings as you like.

3. After that, go to the File Menu, select "Save as AVI". Enter a new name and save the file.


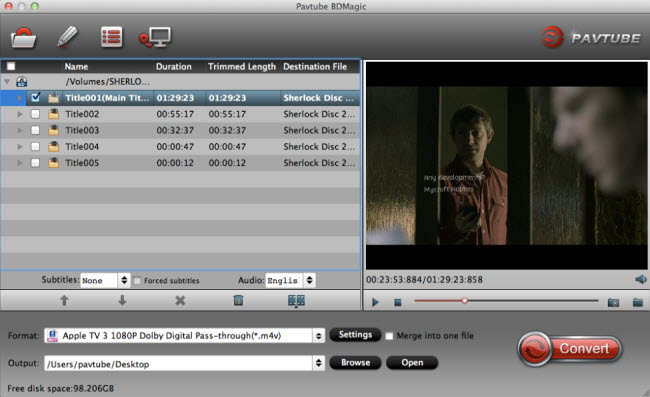
Edit Video with VirtualDub Alternative

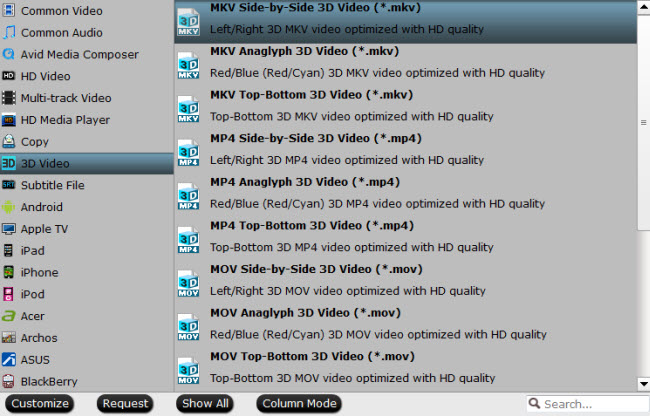
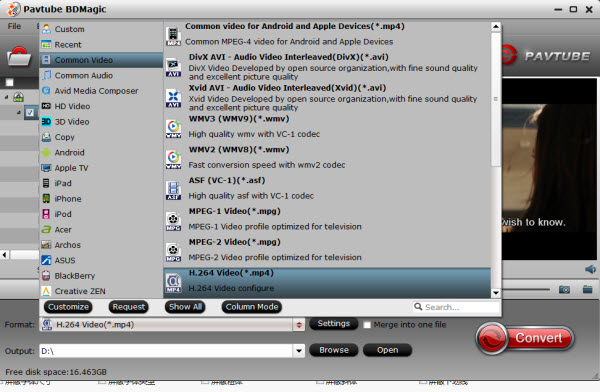
The lack of VirtualDub is that you only can edit AVI videos with it. If you want to edit MP4 video, MKV video, etc, you maybe need a VirtualDub alternative. Pavtube Video Converter Ultimate can alter VirtualDub to crop, trim, split, merge video and add subtitle to video, replace/mute audio in video, add watermark to video, etc. It can edit MP4, AVI, MKV, WMV, FLV, MOV, TS, MXF, M2TS, VRO, Blu-ray, DVD, etc video.

Free download and install Video Converter Ultimate on PC:


Get Mac Version here.

Edit Video with Pavtube Video Converter Ultimate

Load file(s)

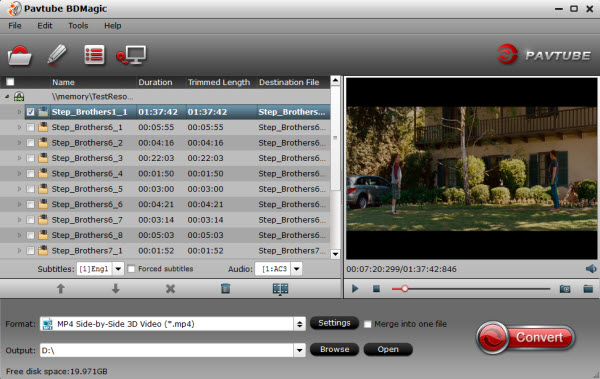
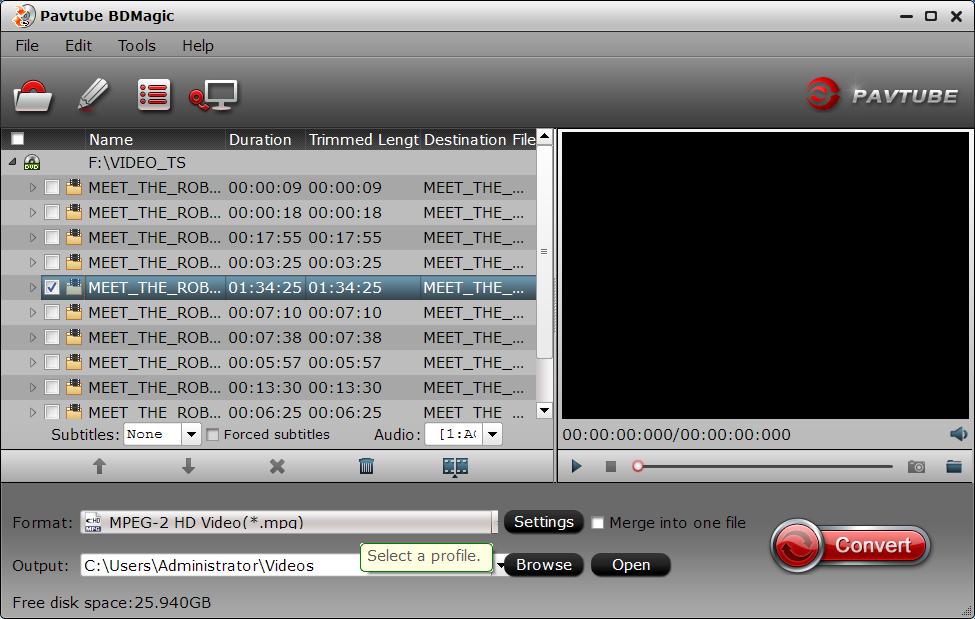
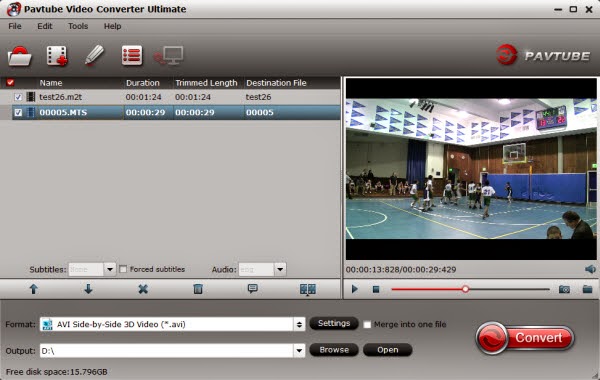
When you start up Pavtube Video Converter Ultimate, the main interface pops up:

Load video files to the software using any of the three ways below:

A. Click “File” menu, and select “Load IFO/ISO”, “Load from folder”, “Load from disc”, "Add Video/Audio" or "Add from folder" to import source files.

B. Click “Load file(s)” button or “Add video" button to import source files.

C. Open the folder that contains source files, and drag and drop video, audio and image files to the program. Useful Tips: If you are loading TiVo shows to Pavtube Video Converter Ultimate, please enter your Media Access Key as the program asks, and then click "OK" button to confirm.

Edit Video

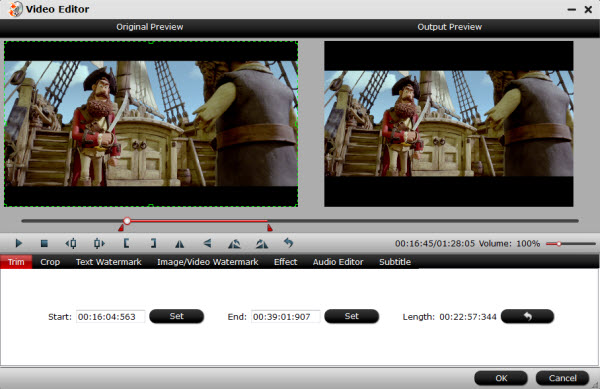
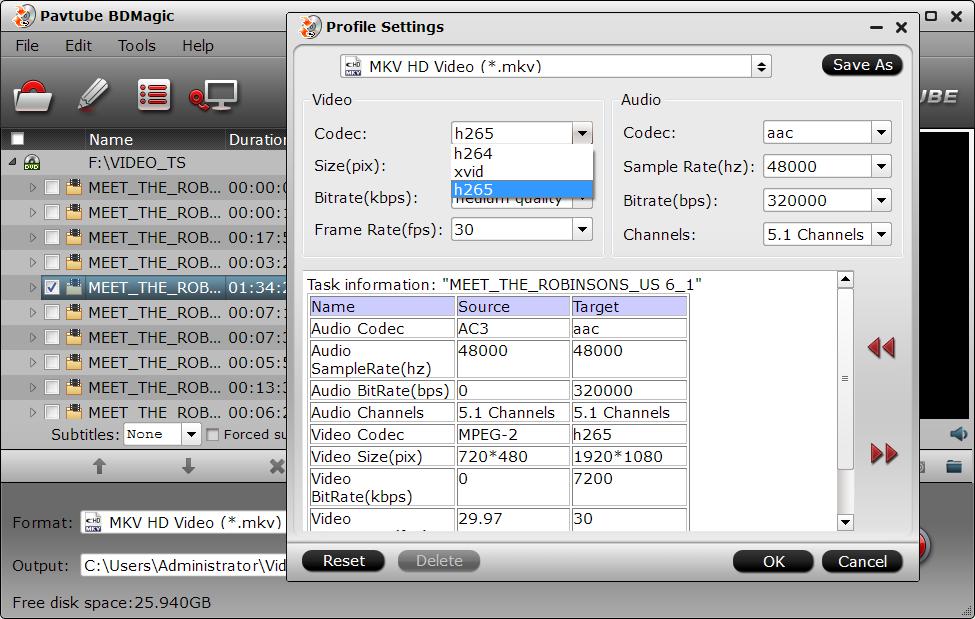
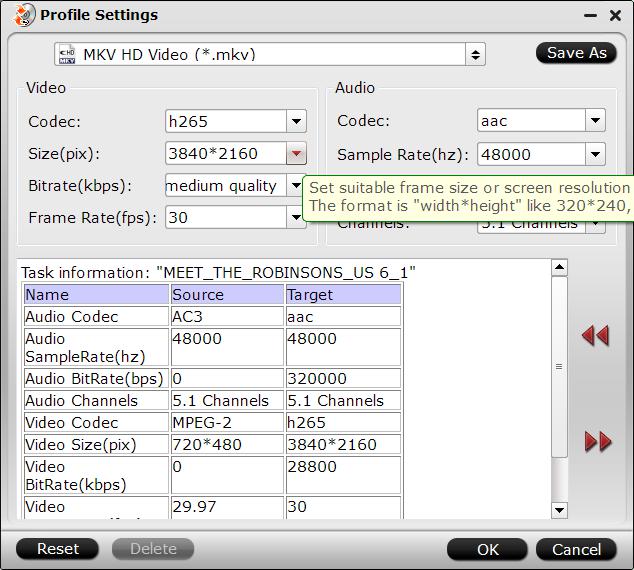
Pavtube Video Converter Ultimate is not only a converter program, but also a simple and easy video editor. By default the “Edit”icon is grayed out. To activate the “Edit” menu, you have to select an item first. When a video file is selected, you can click the “Edit” icon  on the tool bar of main interface to edit selected file. On the “Video Editor” Window, you can play and preview the original video and output effects. Also you can flip video, trim, rotate, and reset.

Play/Pause: Click to start playing the current video or pause the playing.
Stop: Click to quit playback. Previous Frame: Click and go back to the previous frame. 
Next Frame
: Click and go to the next frame. Left square bracket: Click to set the start time for trimming. 
Right square bracket
: Click to set the end time for trimming. 
Flip Horizontal: Click to flip the image horizontally. 
Flip Vertical
: Click to flip the image vertically. 
Rotate conunter-clockwise
: Click to rotate the image 90°towards left. 
Rotate clockwise
: Click to rotate the image 90°towards right. 
Reset: Click to restore default value. In “Video Editor” there are seven edit tabs: Trim, Crop, Text Watermark, Image/Video Watermark, Effect, Audio Editor and Subtitle.


Trim: The "Trim" feature allows users to decide where to start and where to end when converting the selected clip, so that unwanted segments will be cut out after conversion. To trim a video, please switch to "Trim" tab in “Video Editor” Interface.

Trim frame by frame Pavtube Video Converter Ultimate offers "Previous Frame" and "Next Frame" options for users to select frames and trim accurately.

Crop: The "Crop" facility enables users to get rid of the black edges and unwanted area of the image.

Keep original aspect ratio and cropped aspect ratio

To keep original aspect ratio, users need make sure the "Display aspect ratio” and the "Size (pix)" in "Settings" option are all set as "Original". If you want to keep the cropped aspect ratio, Pavtube software offers several aspect ratios for you to choose from, including 16:10, 16:9, 5:4, 4:3, 3:2, and 2:1.

Text Watermark: Check Enable, you can add text watermark to selected video clip. You can either set parameters or drag the text on preview screen to set its location.

Image/Video Watermark: Check Enable, you can add images or videos as watermark onto selected video file. The location can also be set by dragging on the preview screen.

Effect: Under Effect tab, you can add special effects like Simple Gauss Blur, Flip Color, Invert, Aged Film to your source video. In Color Control section, you can correct color by adjusting brightness, contrast, and saturation. You can also tick off “Deinterlacing” to keep good image quality.

Audio Editor:You can either replace/remove original audio, or set audio fade in/out effects.

Subtitle: In this tab, you can add *.srt or *.ass/*.ssa subtitle-files to the video as hard subtitles.

Merge, Split and Select Subtitles and Audio Track

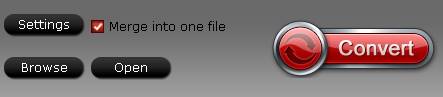
Merge selected files into one: By ticking off “Merge into one file” option behind “Settings” button, you can merge the ticked files in list into one single file.

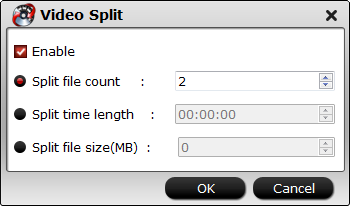
Split selected file into several small pieces:

By clicking the “Split” button  on file list, or from “Edit” menu, you can launch the “Video Split” window. Checking “Enable” to enable it, and then you can split the file by file count, time length, or file size.

Select desired subtitles stream and audio track

There is a bonus feature for you to select wanted subtitles track, and audio to be preserved in the converted files. To enable this feature, you should make sure there are multiple subtitles/audio tracks in your source file. Check the movie titles you want to rip.Click the drop-down list of Subtitles, then all the subtitles info in the Blu-ray/DVD movie will be shown clearly, so you can select your needed language as your subtitles freely.

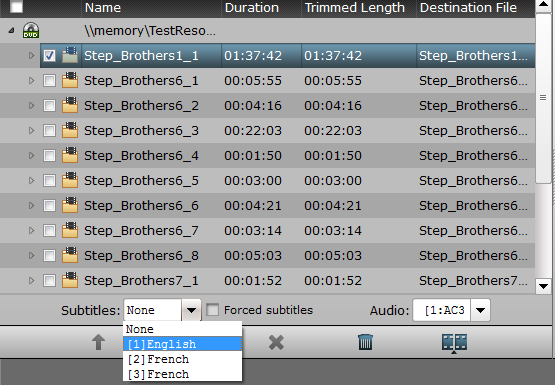
What’s more, Pavtube Video Converter Ultimate also offers an option called Forced subtitles, which enables you to see subtitles only when actors are speaking a different language. For instance, if you specify English (your mother tongue) as your subtitles, and meanwhile tick off “Forced subtitles” option, then when actors are speaking English, no subtitles will show up, but when they are talking with each other in French, the English subtitles will appear accompanying with the French. To select your desired audio track, just click the pull down menu of “Audio”, and then the popup drop-down list will give you the detailed information of all audio tracks, including language, audio codec and stream ID.

If you want to learn the details about each video editing, you can read the detailed steps: How to Edit Video with Pavtube Video Converter Ultimate?

Related Articles:

Monday, September 19, 2016

Create videos with 5.1 audio for the Apple TV

The new Apple TV eats near-Blu-ray quality X.264 video for breakfast—but when it comes to audio, the device is a picky one. With AirPlay streaming, on the other hand, audio is much more flexible than video. What's going on inside the diminutive media player, and what should those of us doing our own audio/video encoding keep in mind?

Audio inconsistencies

The Apple TV will play audio encoded as MP3, AAC, Apple Lossless, and several other formats. The audio that accompanies X.264 video, on the other hand, can only be AAC or AC3 (Dolby Digital, often 5.1 channels surround). But the Apple TV doesn't actually know how to decode the latter—if you want to play multichannel audio through your Apple TV, you need to hook it up to a TV or an amplifier that can accept audio in AC3 format and decode it. Most of the time, this isn't an issue, because AC3 is also used in HDTV broadcasts, so most high definition TVs can decode it, as can specialized "surround receivers" with many, many speakers that decode multi-channel digital audio for a living.

However, if you hook up your Apple TV to a TV or other device that expects to receive uncompressed PCM audio, the Apple TV's unwillingness to decode AC3 can be a problem. In this case, if you attempt to play a video with just an AC3 audio track, the Apple TV will display an error message and refuse to play the video file. Apple itself shrewdly avoids this problem by always having a stereo AAC audio track in all the videos that it sells, so the Apple TV can simply fall back to the stereo track if the display device it's hooked up to can't handle AC3 audio. And the iPhone, iPod touch, and iPad can't decode AC3 audio either, so they depend on the stereo track as well.

Creating your own

So what does this mean when creating your own videos?

Most of the time, it shouldn't matter, as most audio sources are stereo or even mono, so a stereo AAC track is all that's needed. But when ripping DVDs to an Apple TV friendly format, you may want to preserve the original 5.1 audio track as well as create a stereo AAC track, just like Apple does. Pavtube BDMagic for Mac, the powerful video conversion tool, will do this without much trouble.

As a versatile DVD Ripper, the program can stream not only DVD to Apple TV 4/3/2/1, but also rip DVD to iPad (iPad Pro, iPad Air 3, ipad mini 4), iPhone (iPhone 7, iPhone 6S Plus, etc.) and many other popular video/audio format like WMV, AVI, FLV, 3GP, MKV, AIFF, AAC, and more. Play DVD on Android mobile phones is also a simple case with this DVD converting tool.

If you're running a Windows PC, simply turn to Pavtube BDMagic, which allows you to rip DVD to Apple TV format in Windows (Windows 8/8.1/10).

How to Rip DVD to Apple TV with 5.1 Audio?

Step 1: Run Pavtube DVD Ripper for Apple TV, and import DVD movies files to the program. You can directly load DVD source from your DVD disc by inserting it to your DVD Rom, or you can import source movies from ISO/IFO file or a DVD folder stored on your HDD. 

DVD to Apple TV Converter

Pavtube DVD to ATV Converter checks the main title of the DVD automatically once you loaded the source movie. If you don’t want to rip the main title, you can uncheck it, and tick off whatever title you want to convert for Apple TV. Plus, you can select your wanted subtitles track to be embedded into the resulted files before conversion.

Step 2: Choose “Apple TV 3 Dolby Digital Pass-through (*.m4v)” as output format 

In order to have Dolby Digital 5.1 surround sound in the final output files for Apple TV 3, you should select “Apple TV 3 Dolby Digital Pass-through (*.m4v)” as target format.

The best video format and settings for Apple TV 3/4 DVD streaming:


Format: Apple TV 3/4 Dolby Digital Pass-through (*.m4v)

Video Settings

Audio Settings

Codec: h264 
Resolution: 1920*1080  
Bit Rate: 6,000 kbps 
Frame Rate: 30 fps

Codec: aac  
Sample Rate: 48,000hz
Bit Rate:160,000 bps  
Channels: Stereo

By choosing this format, you will get two sound tracks in the resulted 1080p m4v video, one is stereo, and the other is AC3 encoded Dolby Digital 5.1 pass-through. When your Apple TV is connected to audio receiver, the 5.1 surround sound will work. When ATV is connected to your HDTV only, the stereo track will work.

Step 3: Rip DVD for Apple TV

Click Convert button to start DVD to Apple TV conversion. When the DVD to 1080p M4V conversion task is finished, you can click Open button to get the converted DVD files that are available for Apple TV Dolby Digital 5.1 pass-through.

For more Apple TV related topics such as Apple TV supported file formats, Apple TV related hot issues, Apple TV video/audio playback solution, please visit our Apple TV page.

Related Articles: